
Recently I built an e-commerce website using the static site builder Jekyll. This is a quick over-view of what I did. This being my first attempt at a Jekyll driven e-commerce website there were some issues to overcome. I hope this post, and video, will be helpful to anyone doing this for the first time. I’m sure I made mistakes, and if I was to build a second site, there are things I would do differently.
I’ve built a lot of e-commerce sites using Shopify, WordPress & WooCommerce, and even Magento. But my love of simplicity and what static sites bring to the table inspired me to try this project.
If you are reading this post I am going to assume you already know how to install and use Jekyll. There are tons of great resources out there if you are not familiar with how a static site generator works. I personally love working with Jekyll and GitHub pages. I moved all my websites away from WordPress to Jekyll. The sites are faster, more secure, and easier to maintain.
Jekyll and Data Files
You are going to need some way of managing product data. And if you want to use a place like GitHub to host your site, you can’t use a database. The best solution is to use a CSV, YML , or JSON file.
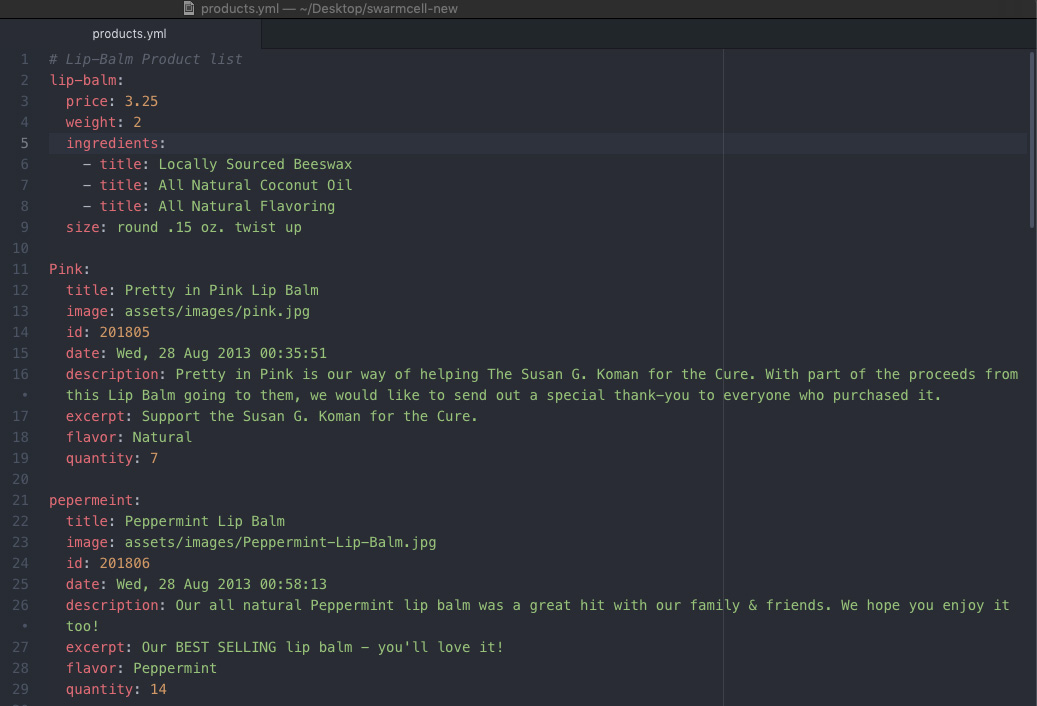
In my project I created a simple YML file. As you can see below I created “records”. Each product, in this case beeswax lip balm, is represented by one record. You can include as little or as much data as your products need.
pepermeint:
   title: Peppermint Lip Balm
   image: assets/images/Peppermint-Lip-Balm.jpg
   id: 201806
   date: Wed, 28 Aug 2013 00:58:13
   description: Our all natural Peppermint lip balm was a great hit with our family & friends. We hope you enjoy it too!
   excerpt: Our BEST SELLING lip balm - you'll love it!
   flavor: Peppermint
   quantity: 14
After the YML data file has been created you save it in the “_data” folder within your Jekyll project. This data can also be leveraged by plugins and themes. But in my project I’m keeping it as simple as possible.
Creating a Product Page
By using the blog post function of Jekyll I was able to quickly create product pages. All I had to do was add some variables to the “front matter”. Beyond the normal variables like layout, title, and description. I had to add one that would connect the post to a specific “record” in the Product.yml file.
This way the content on the blog post page will come from the YML file. In essence a product page is just a Post with some specific front matter. If I add a new product it will appear at the top of the home page. If you’ve worked with Jekyll at all, most of this stuff is fairly normal.
Product Page Layout – The Tricky Part
This being my first use of data files with Jekyll, I came across a few things that stumped me. Pulling information from the data file and displaying it on the page was fairly straight forward.
I found out that you can pass a front matter element into the code by way of the square brackets [ ]. However, where the dots go (and don’t go) make all the difference. Normally each section of the “path” in the code is separated by a dot. For example:
{{ site.data.products.lip-balm.price }}
This basically says to look in the SITE, in the DATA folder, in the PRODUCTS file, look for the LIP-BALM record, and display the PRICE. Simple enough to understand. However when this is used in a layout file I needed to grab information from the front matter.
Things like paths to product images are stored in the YML file. The layout needs to know what “record” in the YML file is associated with this Post (product page) and display the information from that record. To do that you need to dynamically pull the “record” from the front matter.
This changes the way the code is written. It is a little unintuitive. In the above example each item is separated by a DOT. Logically I thought the DOTS would stay and I’d just have to add a little more code. By adding in, [page.record] I should be adding the specific record from the front matter. Something like this:
{{ site.data.products.[page.record].image }}
However, that is WRONG. I added an extra DOT. The DOT after “products” caused this to fail. The correct way to write this is:
{{ site.data.products[page.record].image }}
To my eye this “looks” wrong. It looks like the “record” pulled from the front matter will be stuck next to the word “products”. But that isn’t what happens. Writing it that way works like a charm. That little DOT caused me an endless amount of grief.
In the video above I go further into things like using SnipCart as the shopping cart. As well as using Stripe as your payment gateway. Both of those products work very well with Jekyll. As I said, this is my first time using Jekyll as a e-commerce platform. Using SnipCart and Stripe made things a lot easier.
Hosting the site is a mixture of GitHub and CloudCannon. Although since this Post was written the swarmcell lip balm site has been moved to Netlify. Between the two I feel Netlify is a better choice for e-commerce hosting.
I hope this helped. I would love to hear your thoughts and or suggestions. Please share this Post if it was valuable to you. And I look forward to your tips and constructive criticism.