My 2011 Mac Mini was getting long in the tooth. With the upgrade to El Capitan operating system the Mini was definitely struggling. Apple may say that the new operating system is faster, but my real world experience was the exact opposite.
I first tried to speed things up with the addition of more RAM. I ordered 12GB from OWC (Other World Computing) which for me is the best place to get stuff for your Mac. My Mini has been running on OWC RAM for the past 3+ years. Having said that, the first batch of RAM I got was not perfect. One of the two 8GB sticks was not working. However the people at OWC were great and I got a replacement right away. By that I mean like a week later.
With only marginally noticeable increases in speed and performance from adding more RAM I moved on to upgrading the hard drive. I chose the 480GB, Mercury Electra™ 6G SSD, 2.5” Serial-ATA 7mm Solid State Drive from OWC. The 2.5” SATA SSD uses the latest SandForce 2281 Processor and DuraClass™ technology to deliver the highest transfer speed, endurance, and performance available today. It comes with a 3 year OWC SSD Limited warranty. The old hard drive was a 750GB drive which I intended to use as additional internal storage. Stuffing two hard drives into a Mac Mini is a bit of a trick.
Luckily the Mid 2011 Mac Mini is capable of housing two(2) internal hard drives. The trick is to purchase the OWC DIY Data Doubler Mounting Kit which has all the tools and components you need. OWC also has very detailed videos showing exactly how to remove the old hard drive and install the SSD.
I now had all the hardware and tools I needed for the operation. But before you can change-out a hard drive you need to duplicate the old drive to the new drive. While doing this I came across a problem. Even though I only had 110GB of data on the old 750GB drive, when I tried to duplicate the 750GB to the 480GB SSD it would fail and give the error “destination drive is too small”.
This perplexed me for two days. Finally I came across the answer. The Apple Disk Utility doesn’t care about the data on the drive, it just looks at the whole drive size. In order to “trick” or “fool” the Disk Utility what you need to do is partition the old (larger) drive. I partitioned the 750GB drive into two(2) 375GB sections. This gave enough room for my data and made sure that neither partition was larger than the new 480GB SSD.
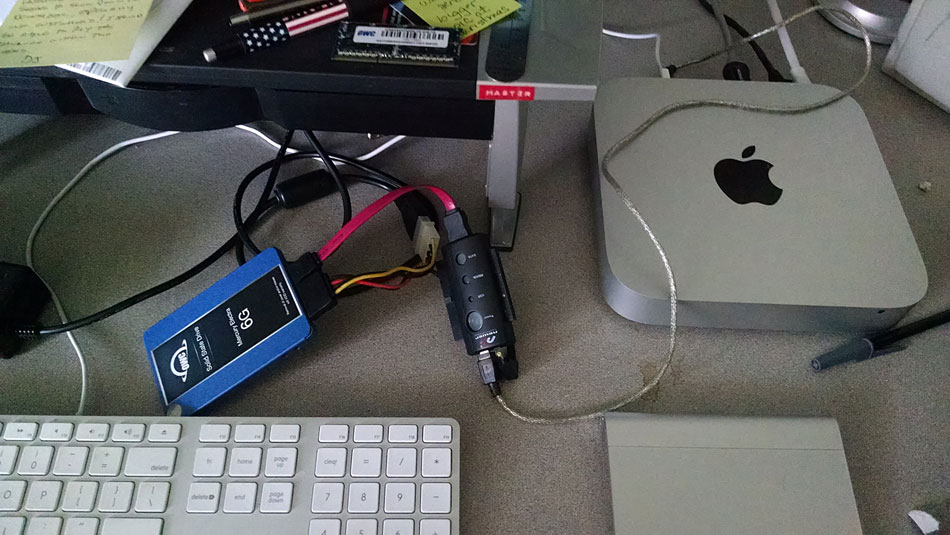
Years ago I purchased this cool set of wires and plugs that let you connect almost any type of hard drive to a computer via the USB port. It is perfect for this type of operation. I only wish they made a Thunderbolt connected version.
I booted into the recover partition by holding down the Command & R keys after the startup chime. I then used the Disk Utility to Partition the old hard drive. Once that was done I used the “Restore” feature to duplicate the old hard drive to the new SSD. When that was completed I verified the duplication by booting up using the externally connected SSD. When you boot up hold down the “Option” key and you can choose which bootable drive to boot from.
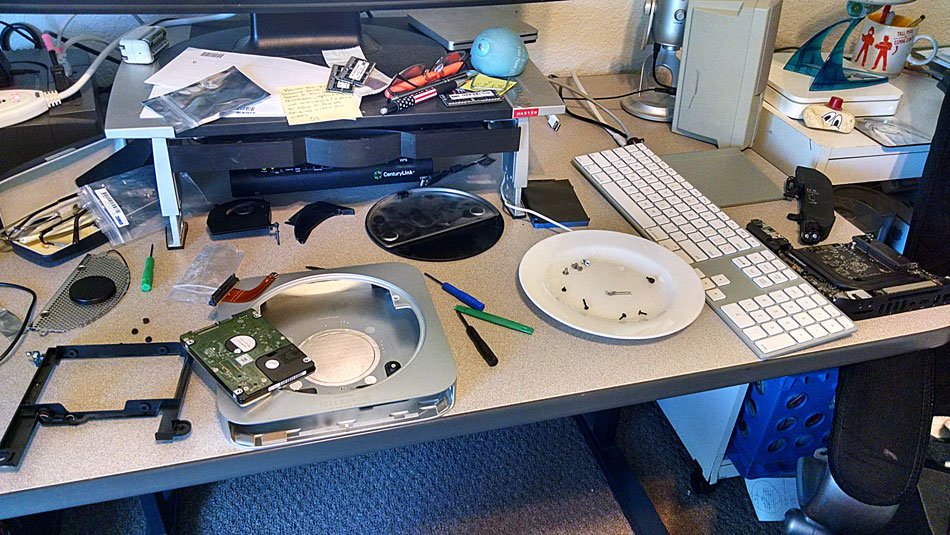
Now I was ready to swap out the drives. I followed the very clear, well written, full color instructions that came with the OWC DIY Data Doubler Mounting Kit. It took about a half hour to complete the upgrade. It went very smooth and I would recommend this kit and this upgrade to anyone with a Mac Mini (2012 or later).
The difference in performance is AMAZING! It is like a whole new computer. Everything launched faster, and runs faster, it is truly astonishing. It also runs much, much cooler and quieter, and the Mini was almost silent before.
Adding a SSD Bad News!!
Unfortunately being able to upgrade a Mac Mini like this no longer exists. Unless you have an older machine like mine you are stuck. Apple has decided that they do not want owners of their new Mac Mini to be able to do any upgrades. I find this very unfortunate and a bit depressing. The new Mini’s do not allow for easy access to the internals and they do not allow for upgrades to the RAM.
One of the strengths Apple had was their treating customers as smart people. By designing and building their computers to be easily worked on they paid respect to their customers. If I was not able to upgrade my Mini I would be FORCED to buy a new computer. Eventually I will need to buy a new computer, but because I was able to upgrade just a few things I have added extra value to my purchase.
The only logical explanation for Apples decision to change how they make the Mac Mini (and their other products) is because it makes them more money. If I can’t open, work on, or upgrade my computer the only other alternative is to purchase a new one.
I feel sad for the next generation of kids. They will never know the joy of learning how to work on a computer. You get a vaster field of understanding when you open and work on a computer. There is great satisfaction that comes from fixing a problem. It is very sad to think that people will be kept from the feeling of accomplishment (and self-worth) you get when you upgrade a computer and can see and feel the tangible results of your hard work.